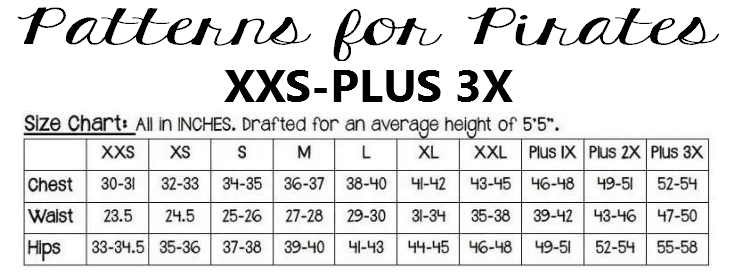
Today we will be printing the pattern in the size needed. In order to do that it is very important that you take your most accurate measurements. You will need your waist, hips and inseam measurements in order to choose the correct Peg Legs size. P4P has an amazing blog that gives you tip for accurately taking your measurements. You can read all about it here.
If you are like me you may need to grade between sizes. My hips put me in a larger size than my waist….or maybe I should say my waist puts me in a smaller size than my hips? 🙂 Worry not! We have a blog post for easy grading too!
Two things are very important to remember when grading the pattern.
- Smooth transitions between sizes!
- Grade both the front and the back of the legs.
Now that we established which size(s) we need it’s time to print the pattern. Did you see that the new updated Peg Legs and Add On pack feature layers now? How amazing is that? Save that ink and print just what you need. Haven’t used layers before? Check out this blog before you do so. If you need to grade between sizes you just need to select the sizes needed when you print. Easy peasy.
Day two will not require you to post any pictures in the Peg Leg SAL event. See you all back here tomorrow!
Thank you to our sponsors!


I just ordered from Boss Lady fabrics. They had some nice bundles. Thanks to the sponcers. I’m looking forward to this sew along. I’m printing my pattern and taping it up!