Spring Time Means Sale Time at P4P
Spring time is here…and with it flowers are blooming and sales are happening!
Please enjoy our Spring Sale Monday, April 25 thru Monday, May 2 (11:59PM US Central Time Zone) with code: springtime for 30% off your total purchase!
The code will pop up on your checkout page and you can just click to apply 🙂 So no need to worry about jotting it down or trying to remember it exactly!
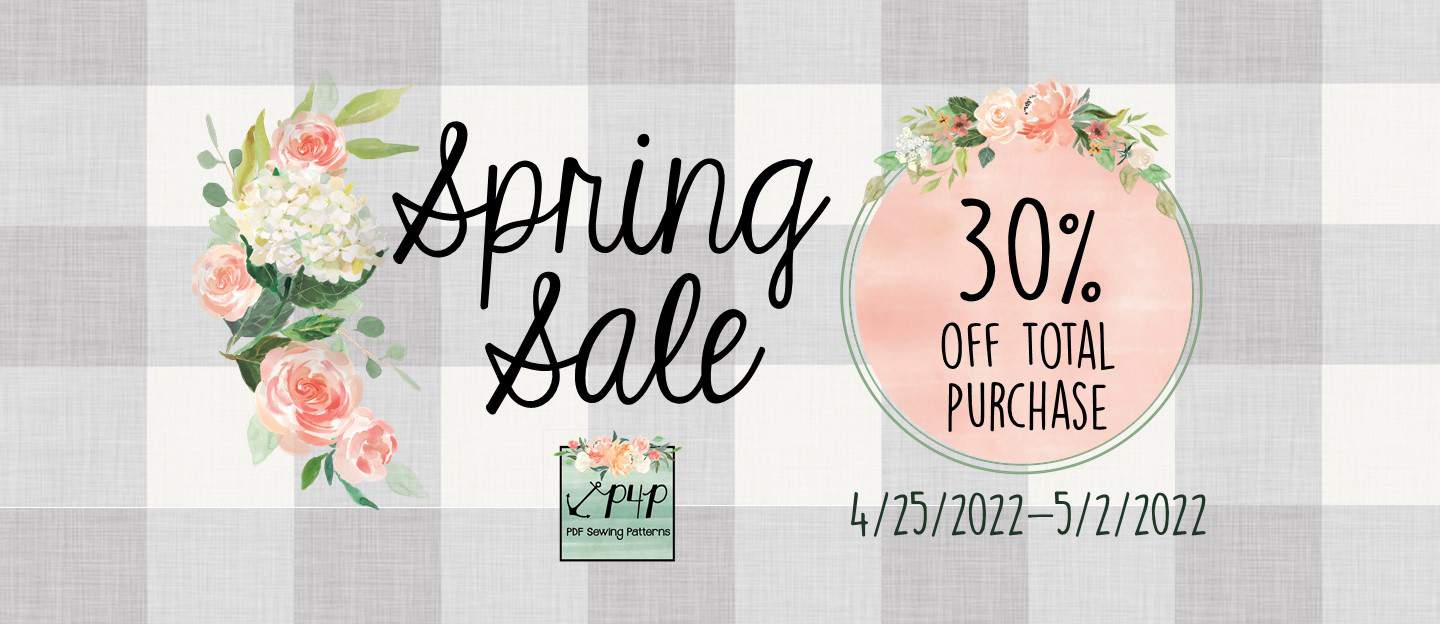
We only have site wide sales 2-3 times a year, so grab the patterns you’ve been eyeing while you have the chance!
Have fun shopping and then sewing!

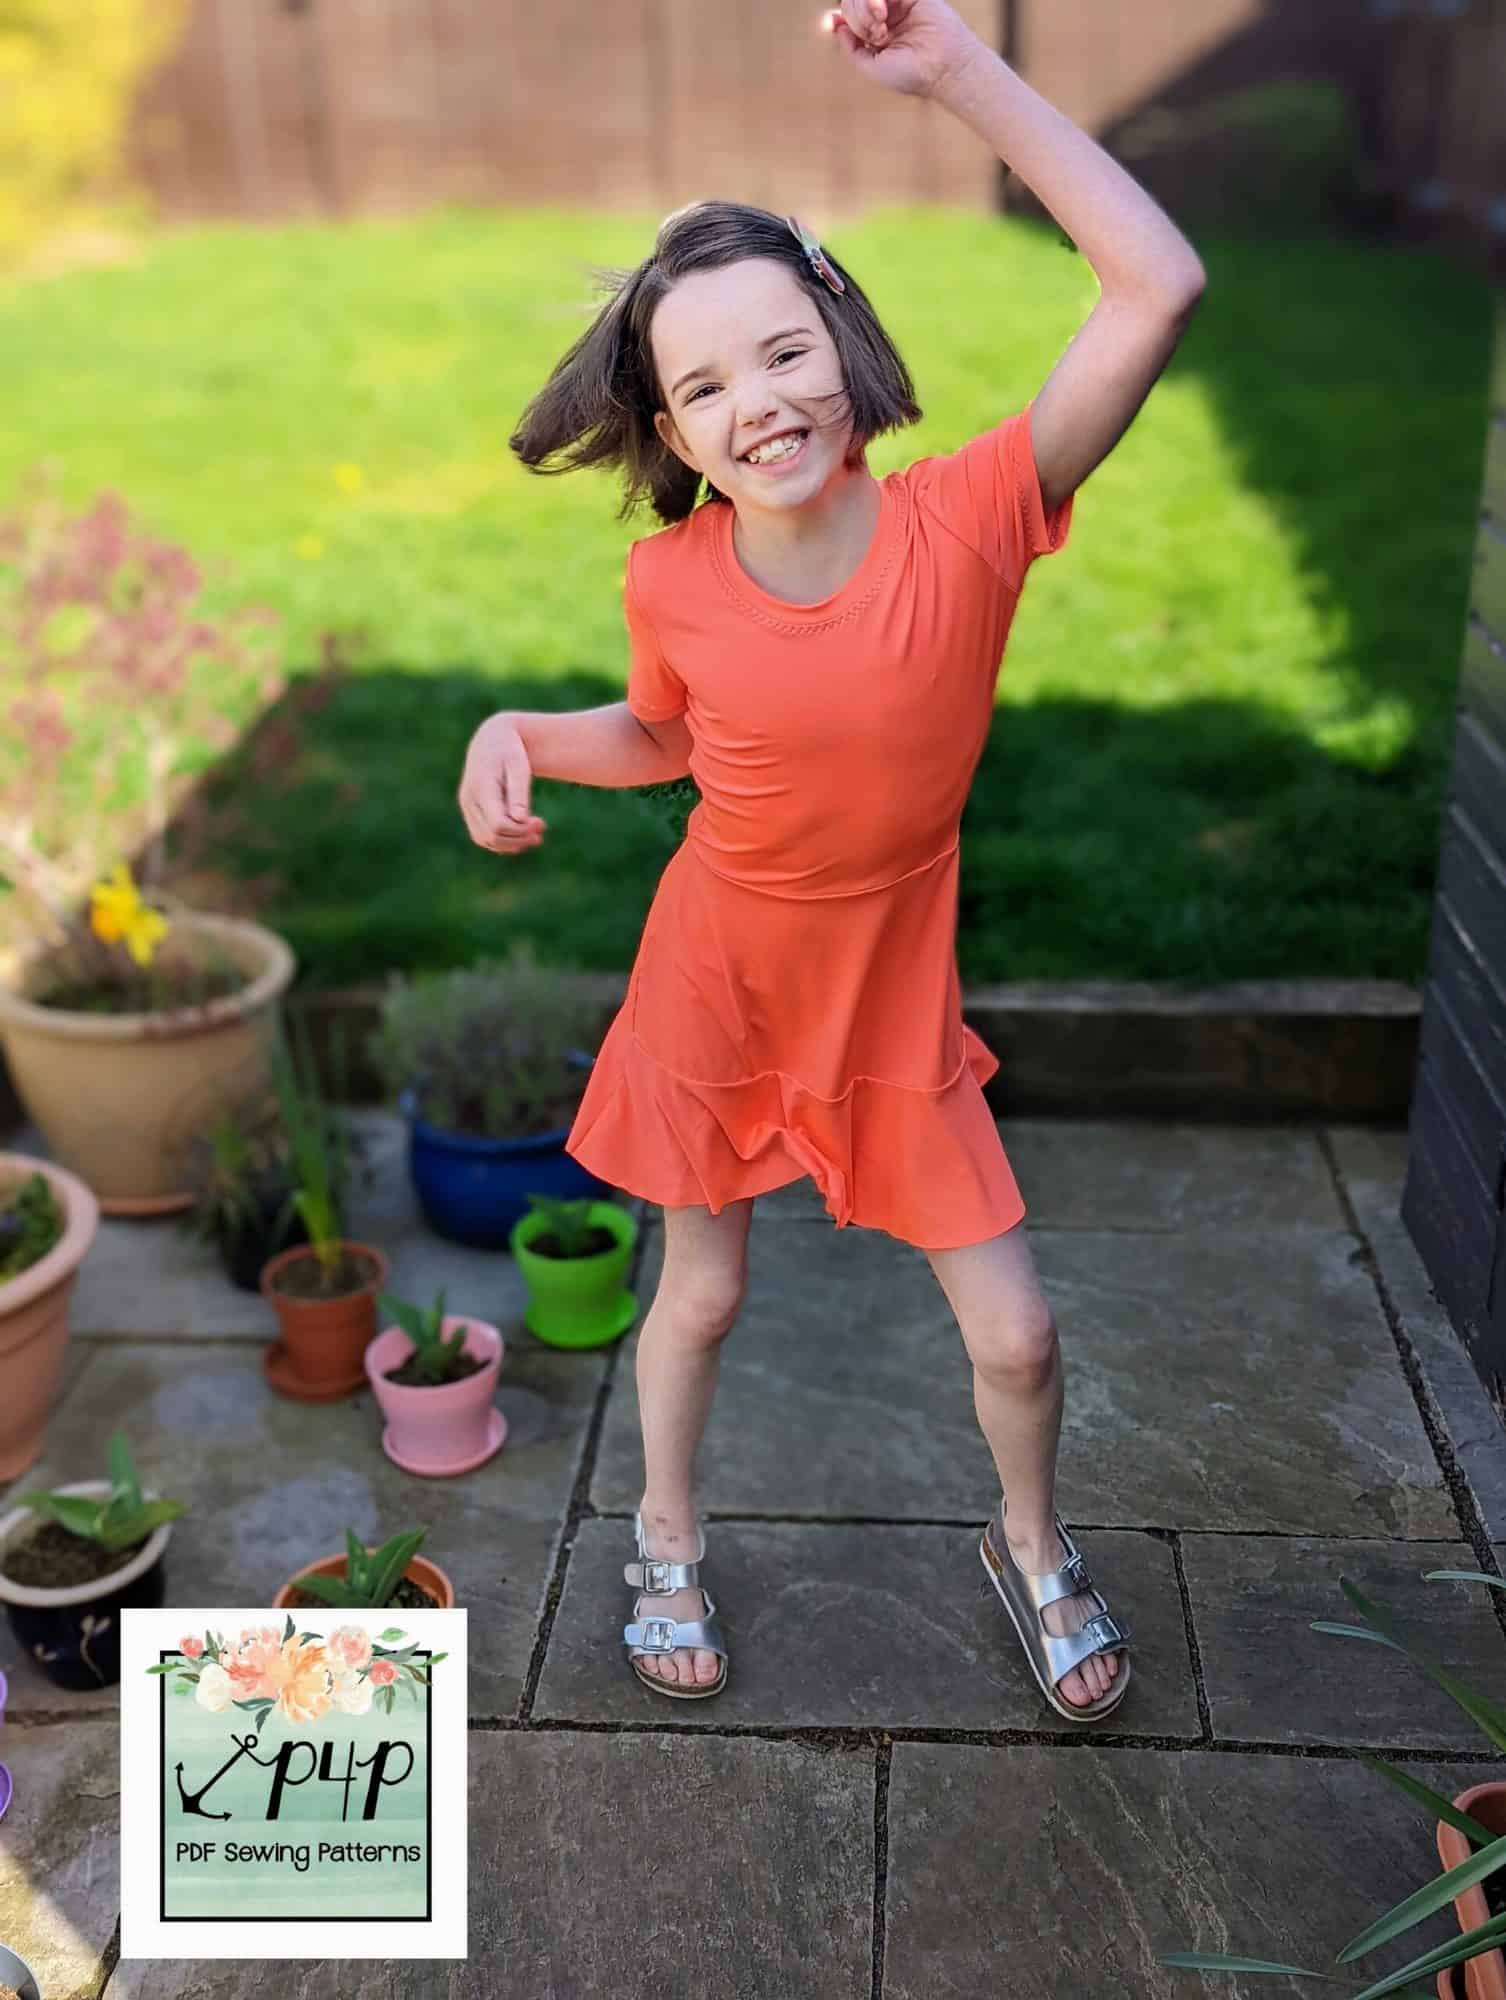
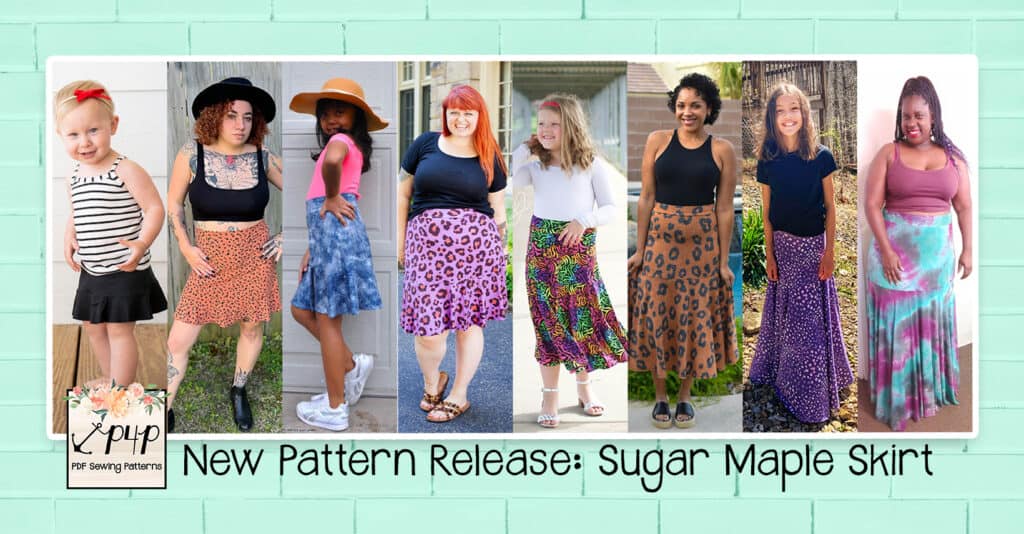
Sugar Maple Skirt :: Easy Hacks
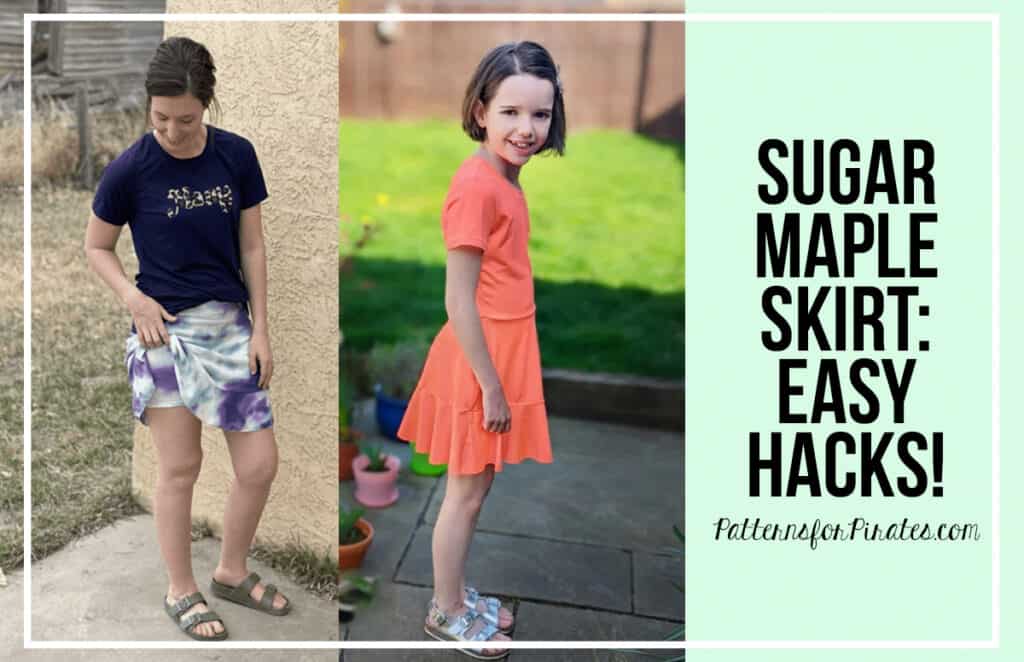
Have you heard the news? P4P just dropped our latest pattern and it’s the swishiest, twirliest thing we’ve put out in a while!
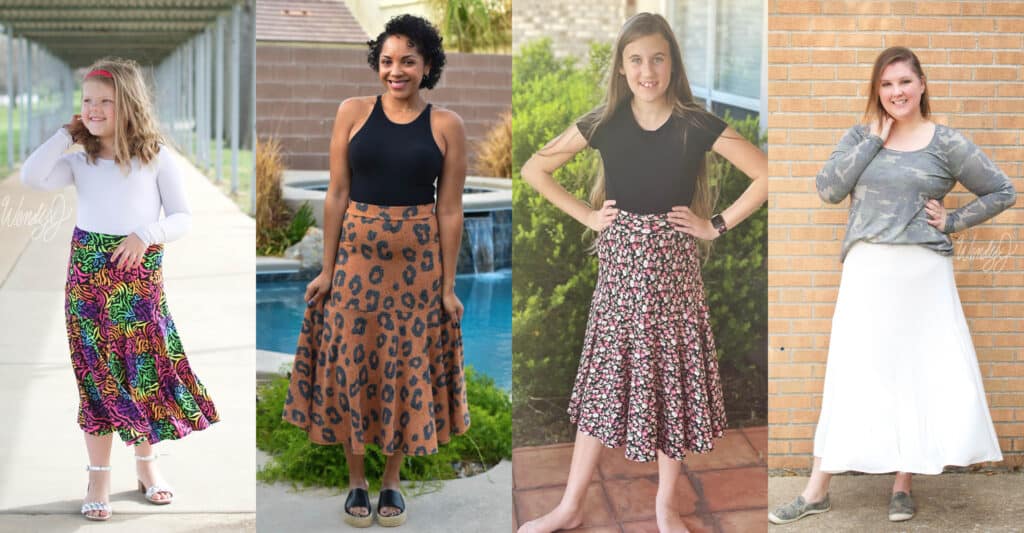
The Sugar Maple Skirt is an a-line skirt with a full circle drop yoke. It is designed to be worn at the natural waist and comes in four lengths: mini, knee, tea and maxi. The top yoke has a flattering, body skimming silhouette, while the fuller part of the skirt joins just below the booty.
Whichever length you choose, each provides for ALL the swishy, twirly goodness that you could hope for in a skirt. The Sugar Maple is a great basic skirt pattern to have, an excellent sewing project for beginners, and it comes together so quickly that you’ll end up making multiple before you even know what happened!
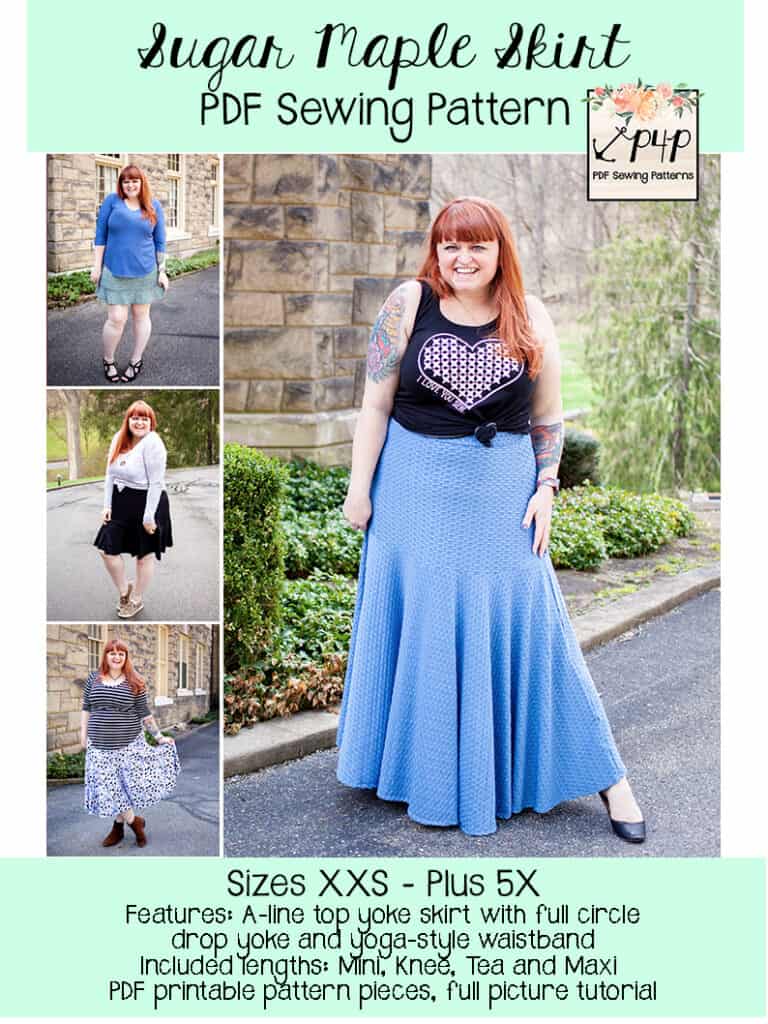

Before you do anything else, go read all about the newest pattern: the Sugar Maple Skirt! It’s available in Adult – Hourglass and Youth sizes and is just the sweetest.
But guess what we went and did? We made it even sweeter by giving you some super easy, super fun pattern hacks to take the pattern a little further!
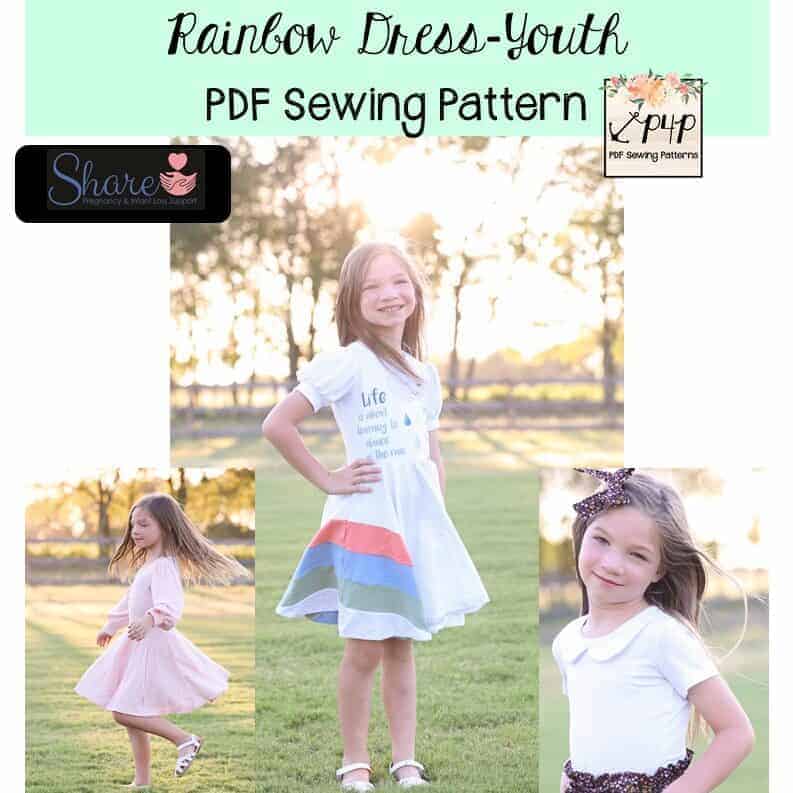
Dress Hack
The best way to get a little bit of twirl into your life is with the new Sugar Maple Skirt, I think we can all agree on that! If you love the twirly, whirly skirt but like the ease of a dress then this hack is for you. My daughter is now 8 and insists on picking her own outfits, but some of her choices can be pretty adventurous and she loves a colour clash. For me, a dress is the easiest option every time. I matched the Sugar Maple Skirt with the bodice of the Rainbow Dress Youth
 They meshed together perfectly!
-

- Sugar Maple Skirt
-

- Rainbow Dress bodice
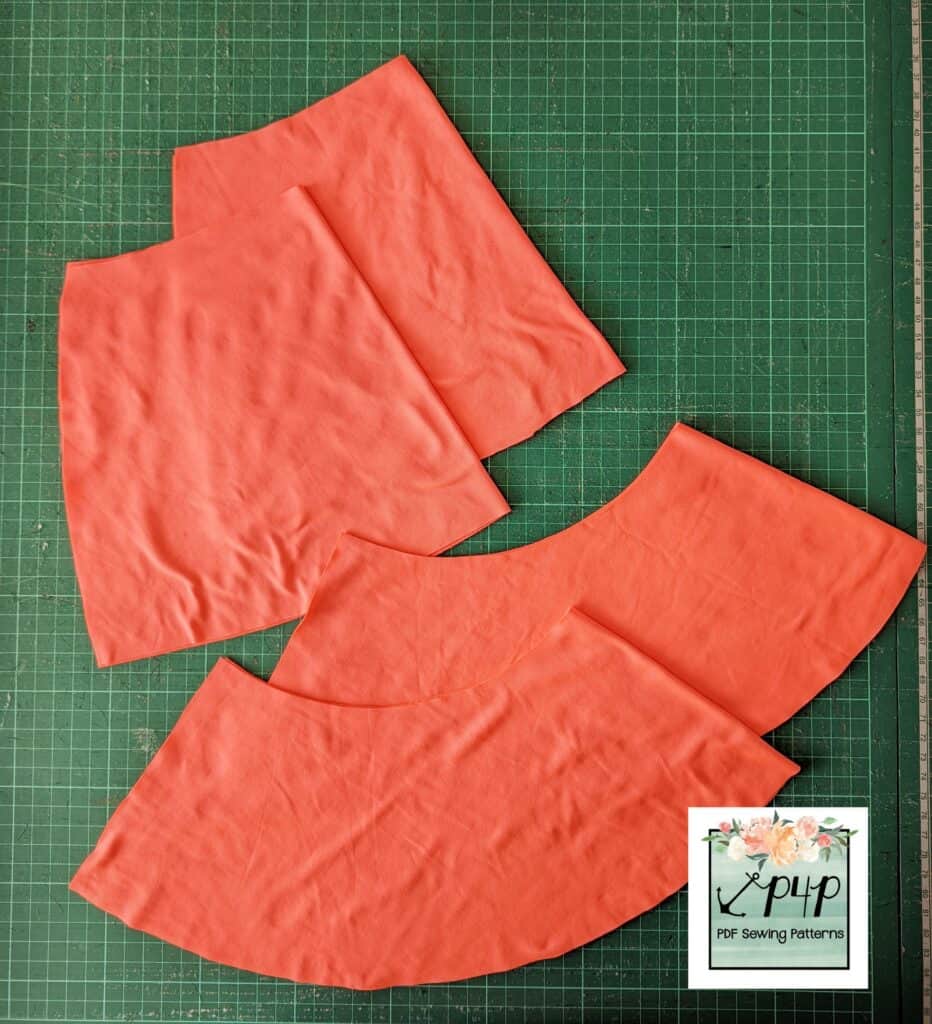
All I had to do was cut out the bodice of the Rainbow Dress and Sugar Maple Skirt as normal and just omit the waistband for the skirt. I sewed them each up individually as per their instructions and then laid them down next to each other to check they would fit together nicely at the waist.
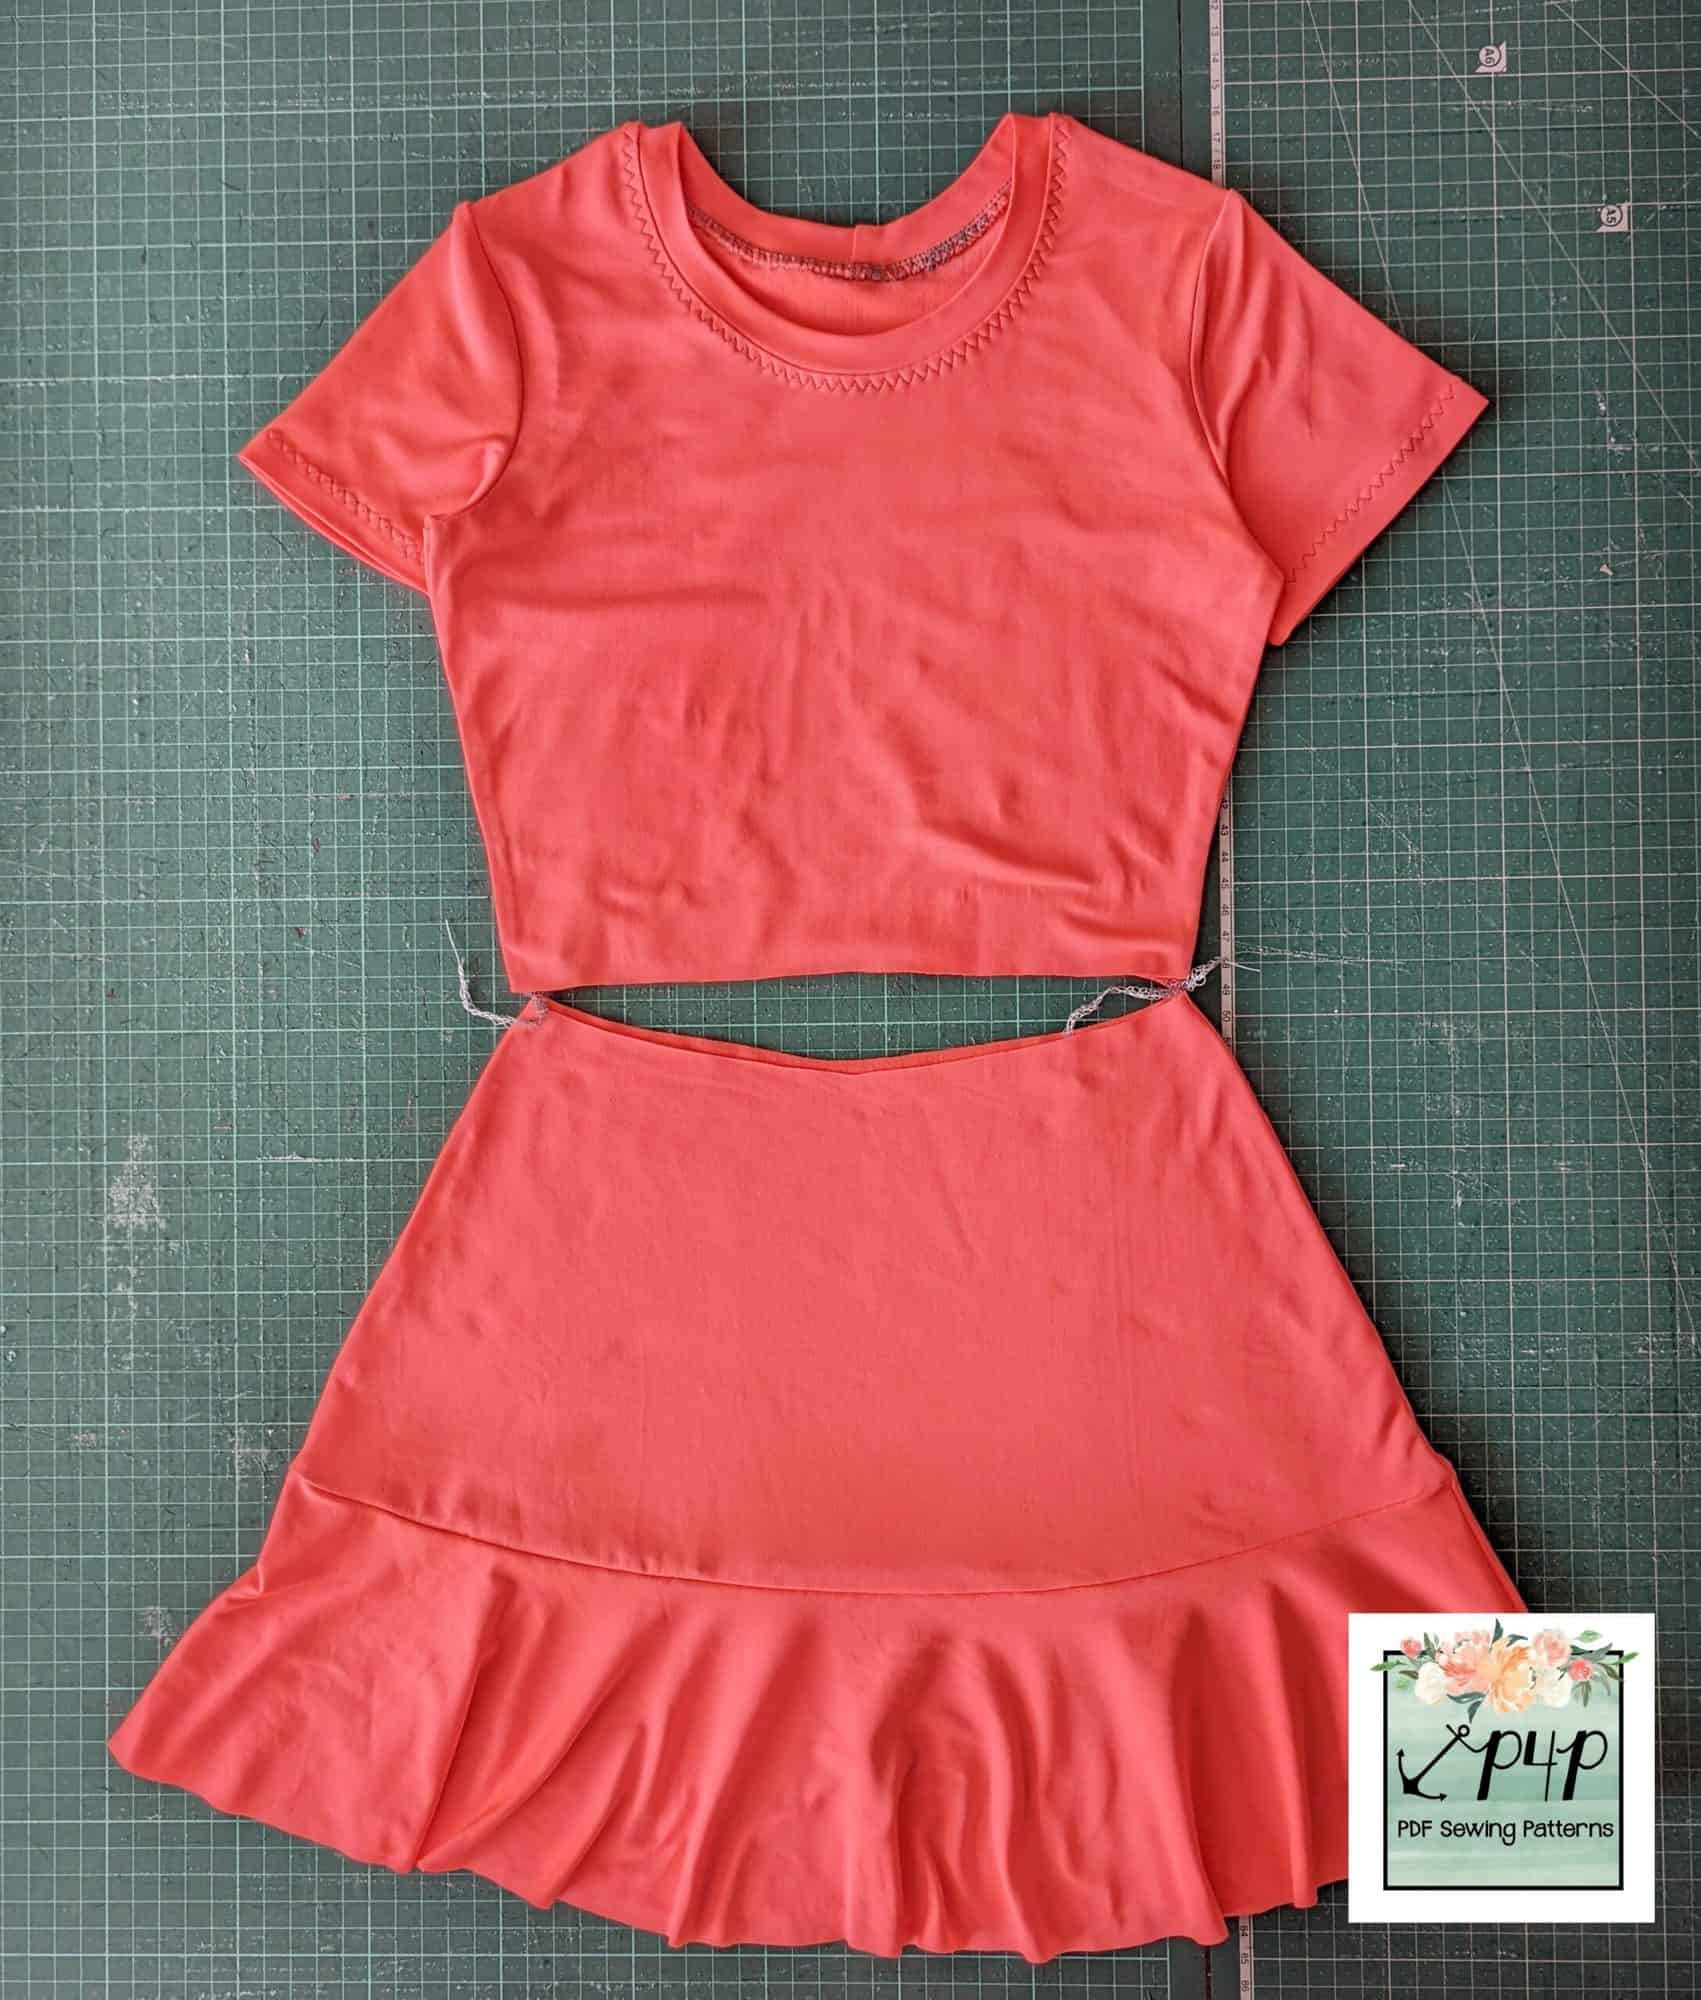
I had to shave a smidge off the side seams at the waist of the bodice to get a perfect fit, but it was only 1/4″ either side. Then quarter your bodice and skirt pieces at the waist, using clips or pins.
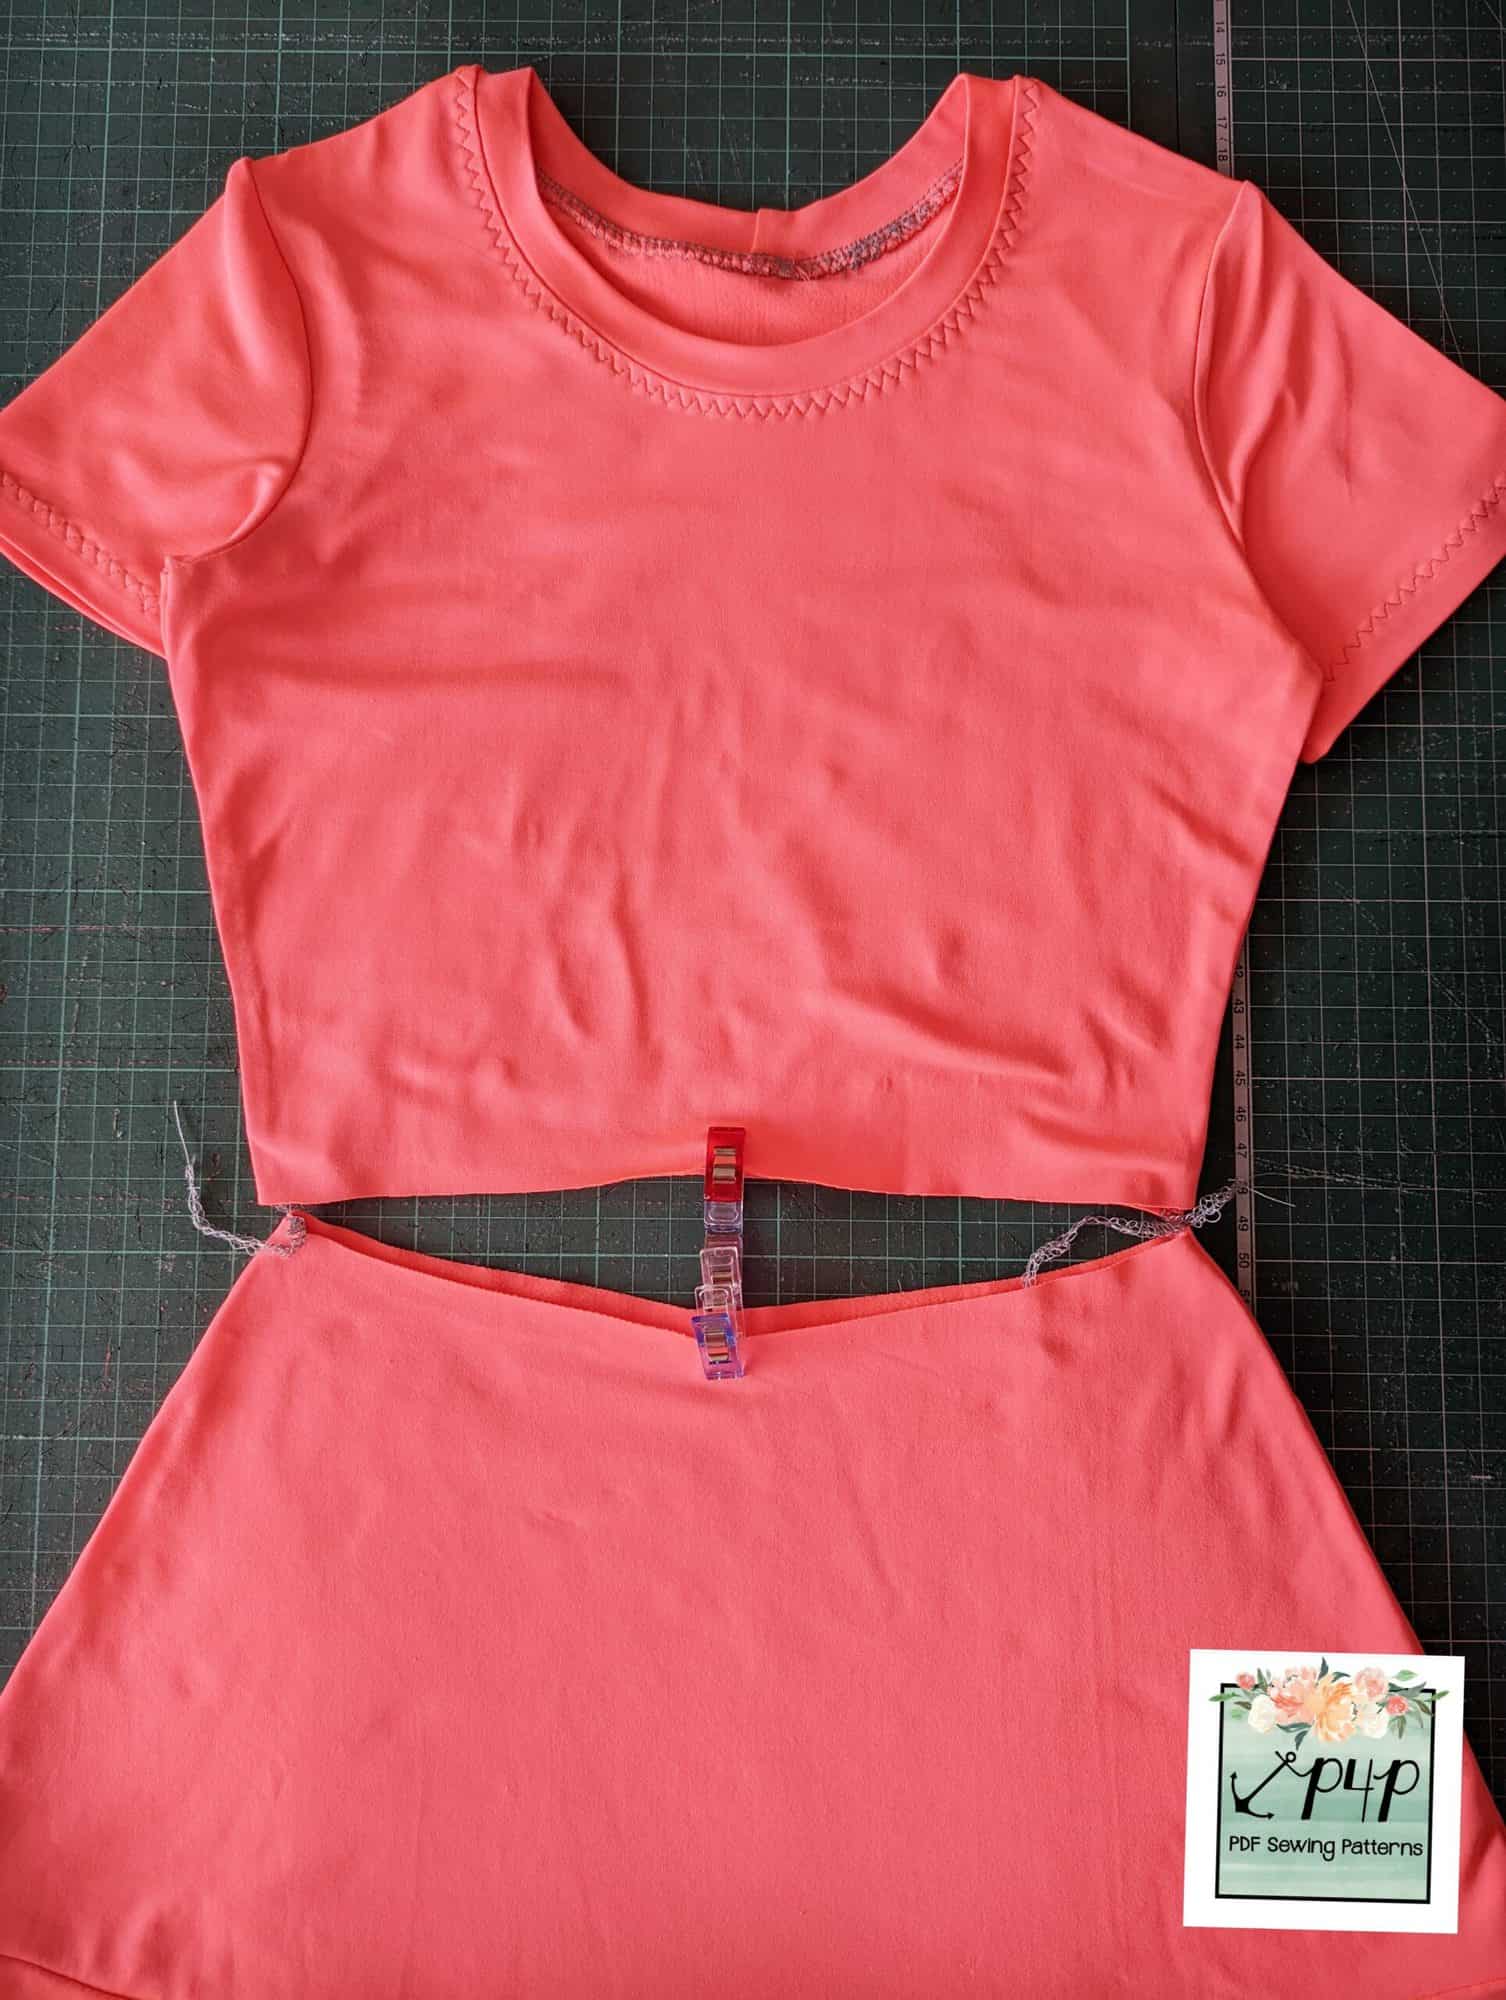
Flip the skirt up and over the bodice so they are right sides together, and clip them together.
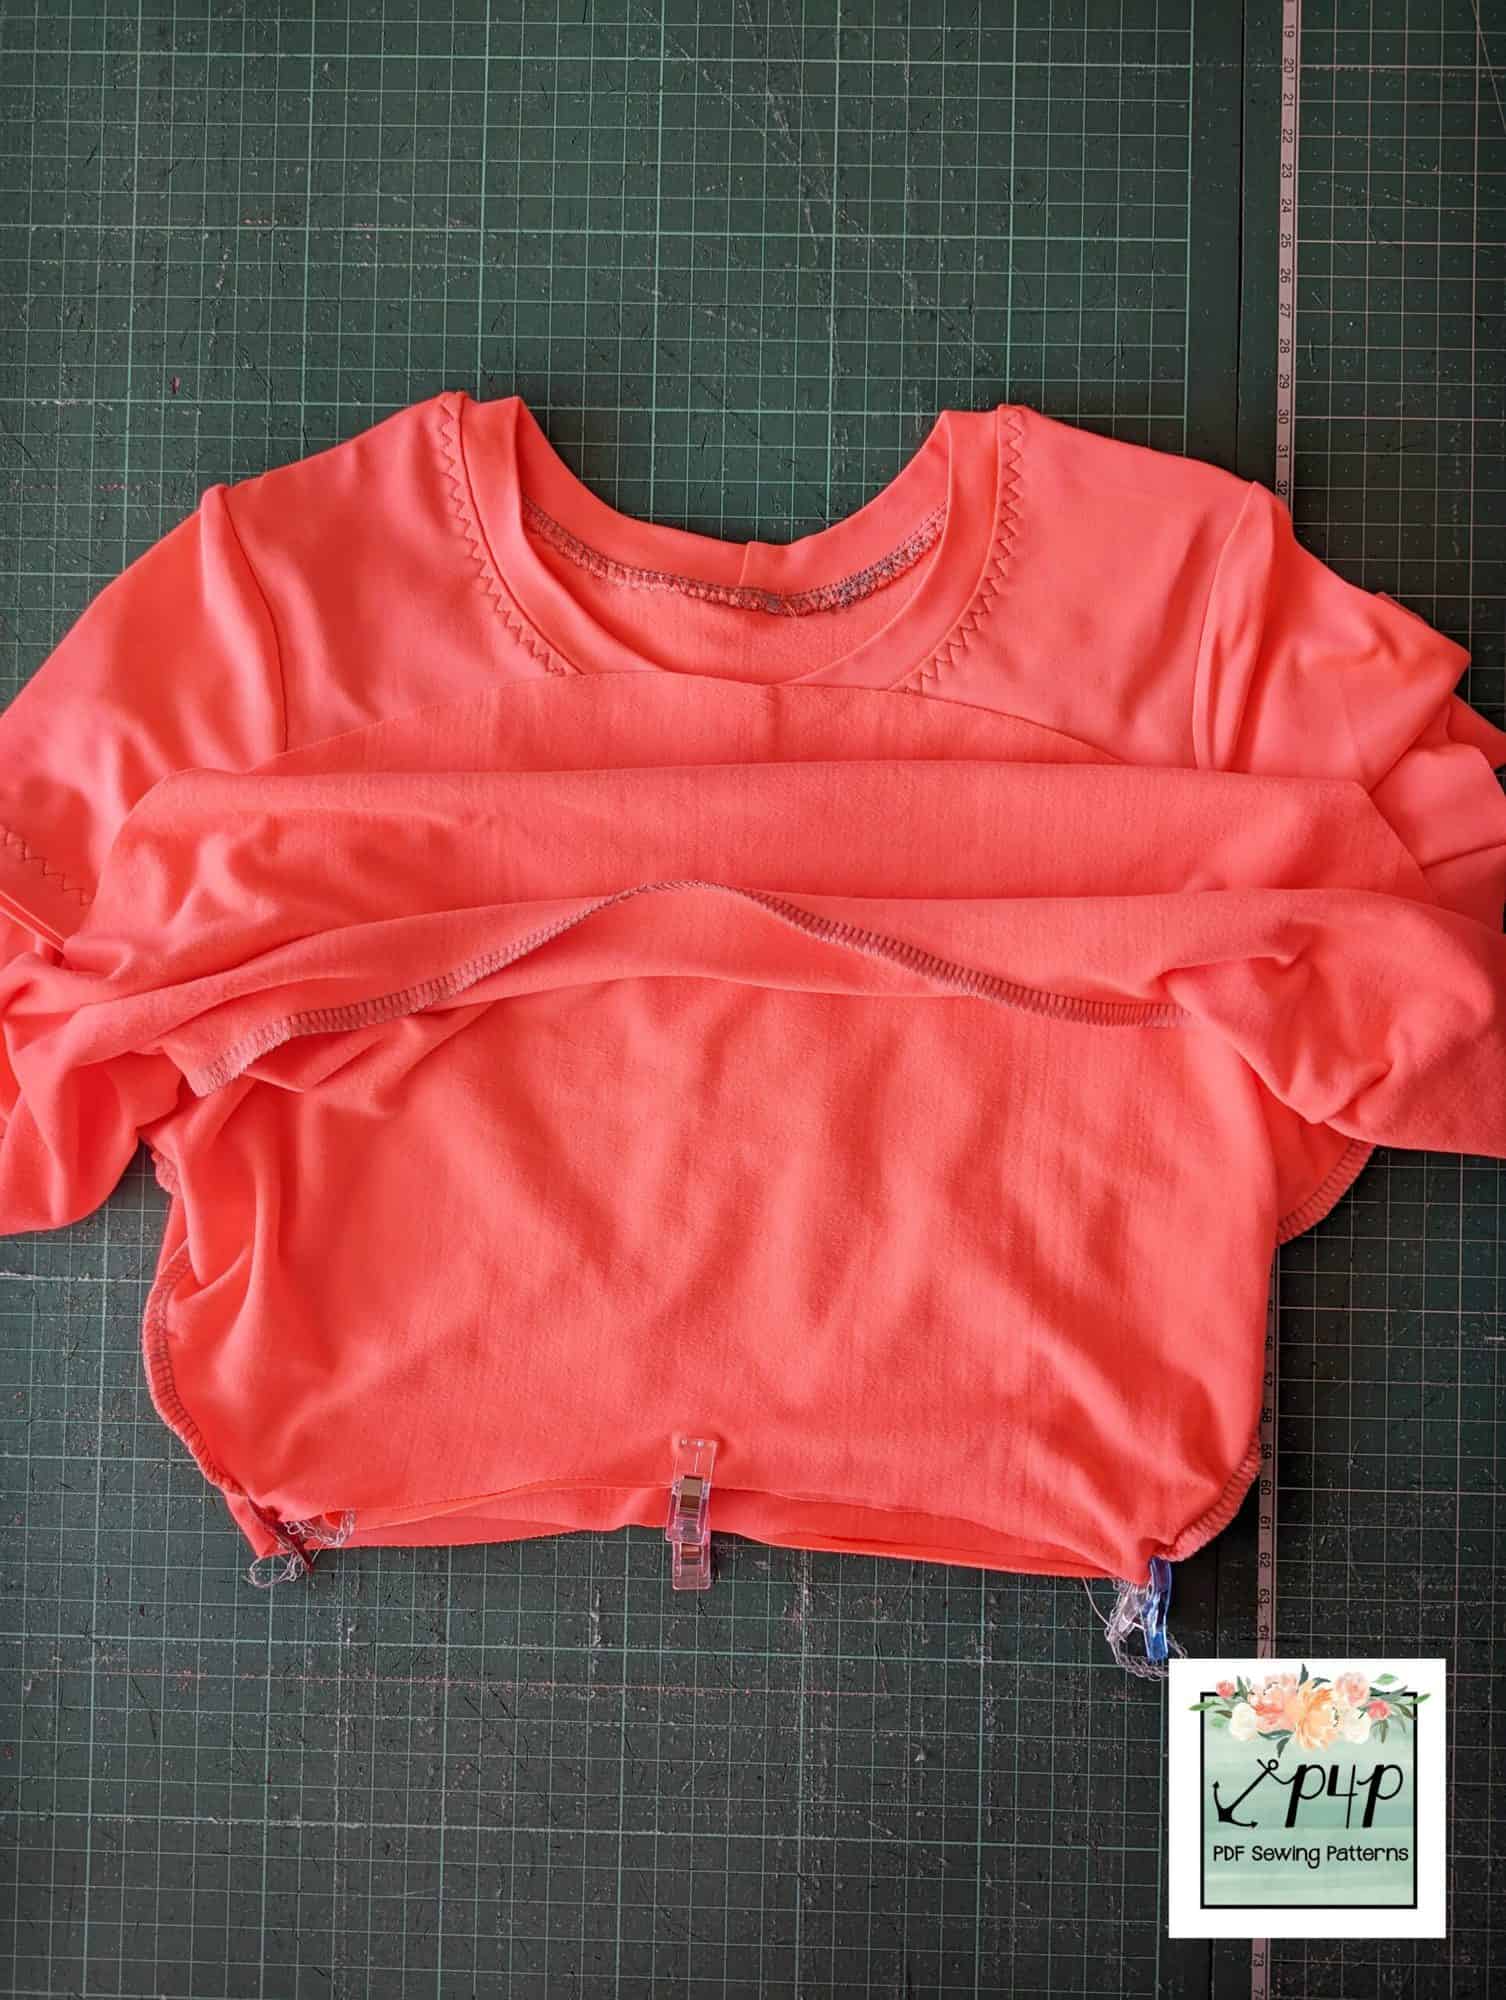
Finally, just sew the skirt to the bodice and you’re done. It’s as easy as that!
Twirl away to your heart’s content. I hope you love your new dress as much as we do. Happy Sewing! Dana xx
Skort Hack
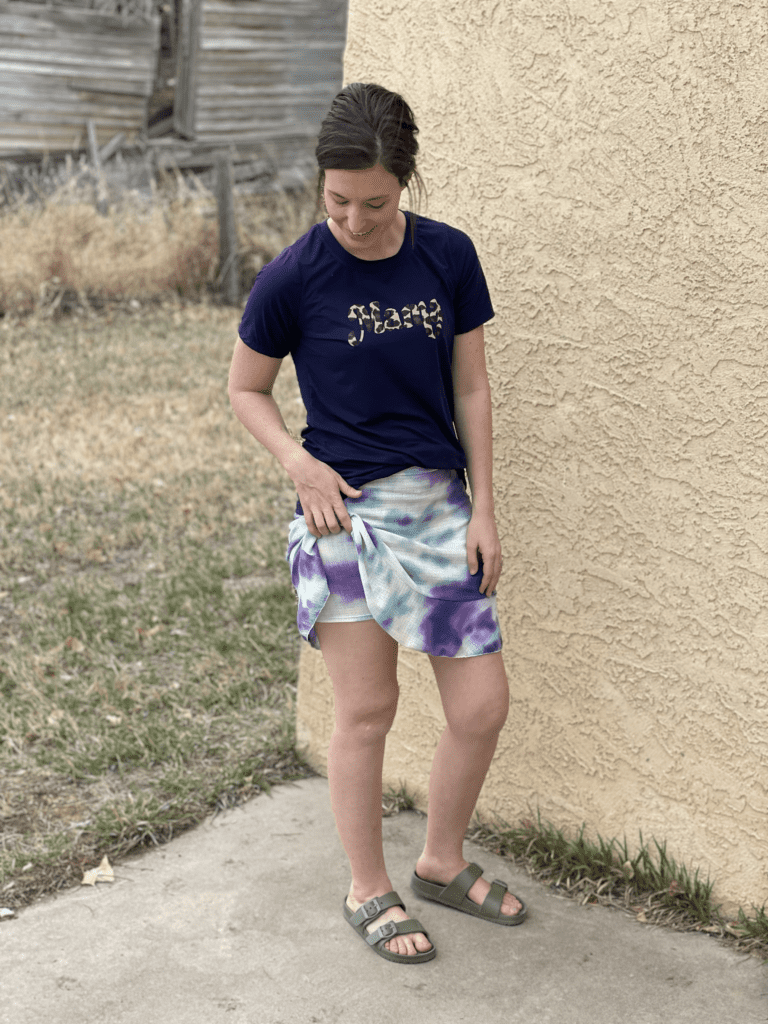
As soon as the testers started talking about their plans for the Sugar Maple Skirt, many of them decided that it’d be the perfect skirt to turn into a skort — and we have the perfect pattern to help create that with the Peg Leg Leggings! Many thanks to Kalene Bartlett, our tester extraordinare, who photographed her steps of making the ::perfect:: skort! My sisters-in-law are big runners and I think they’d adore a running skirt like this! But I’ve also heard that plenty of mommas would love to have some added coverage for chasing littles around during the warmer months….not to mention it’s a perfect solution for fighting off that dreaded thigh chafing experience while rocking skirts. Because the Sugar Maple Skirt is meant to sit at the high waist, you’ll want to cut the Peg Legs pattern at the high-waisted cut line. You’ll need:
- Peg Legs Leggings, in shortie / biker length…depending on the length of your skirt (assembled per the pattern instructions)
- Sugar Maple Waistband
- Sugar Maple Skirt top + drop yokes (assembled per the pattern instructions)
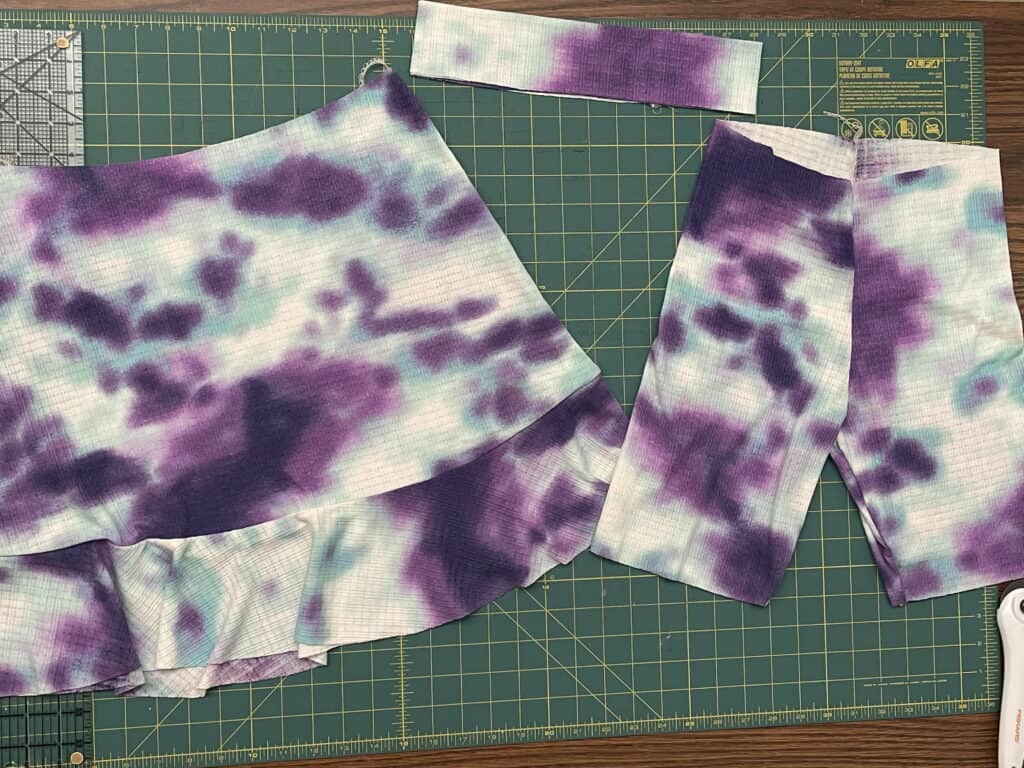
Mark the quarter points on both the Peg Legs and Sugar Maple skirt. Slide the Peg Legs inside of the skirt, right side of the Pegs facing the wrong side of the Sugar Maple. Pin/clip in place.
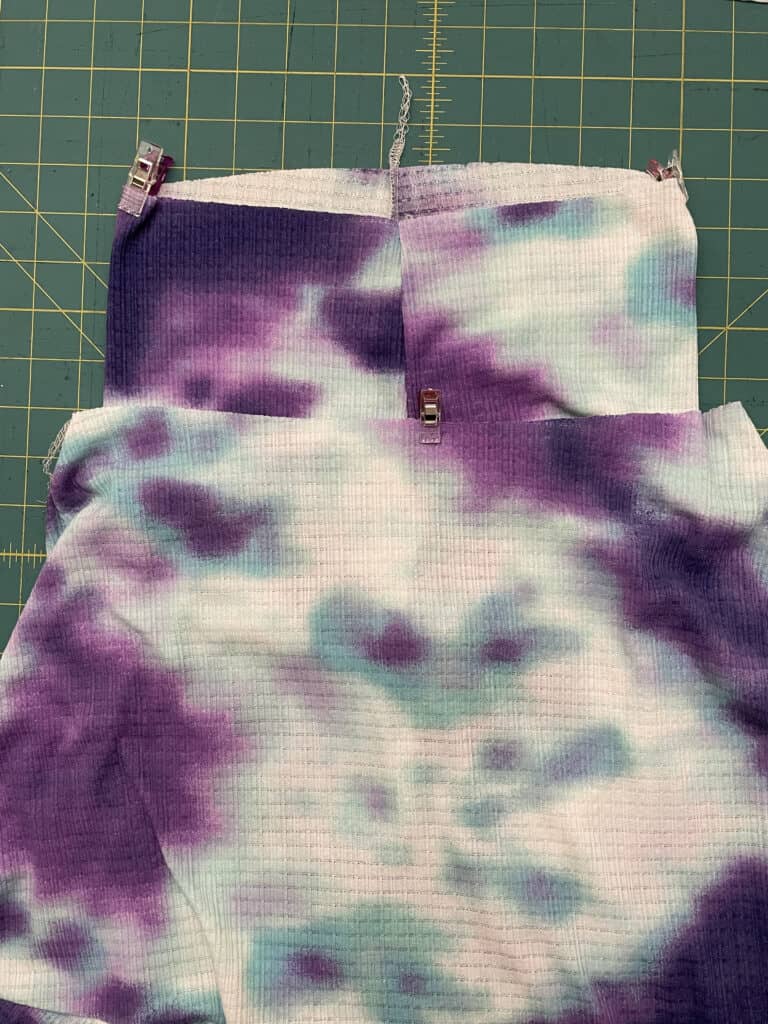
Find the quarter points of the waistband, and slide over the Sugar Maple / Peg Legs pieces…matching previously marked quarter points.
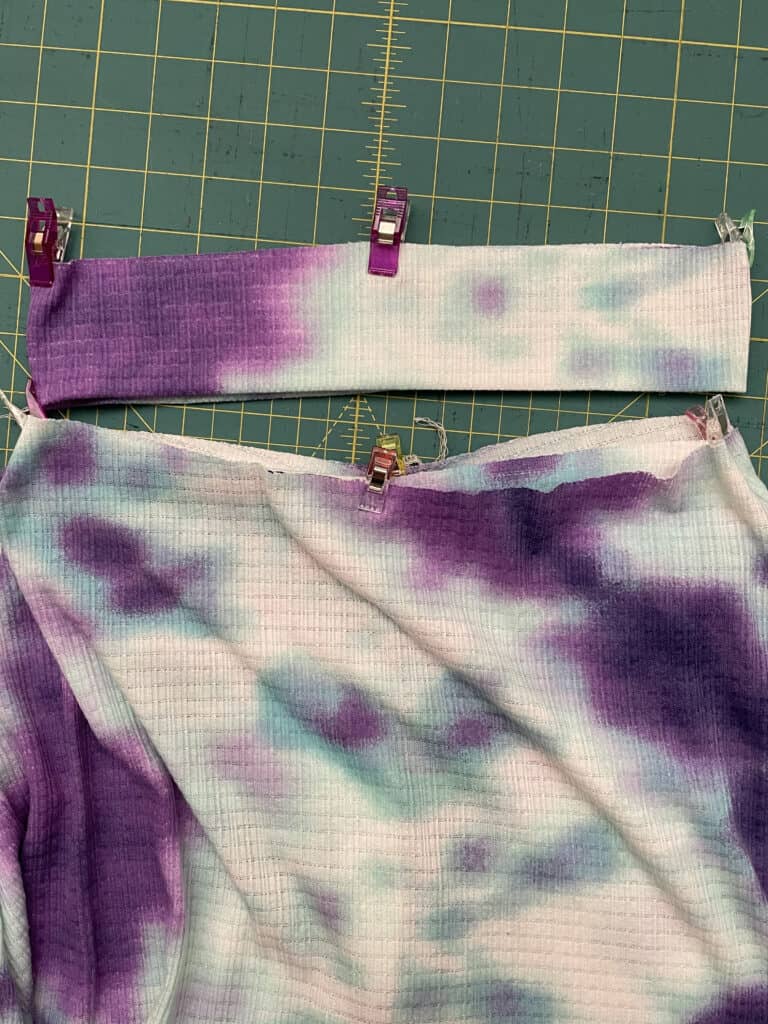
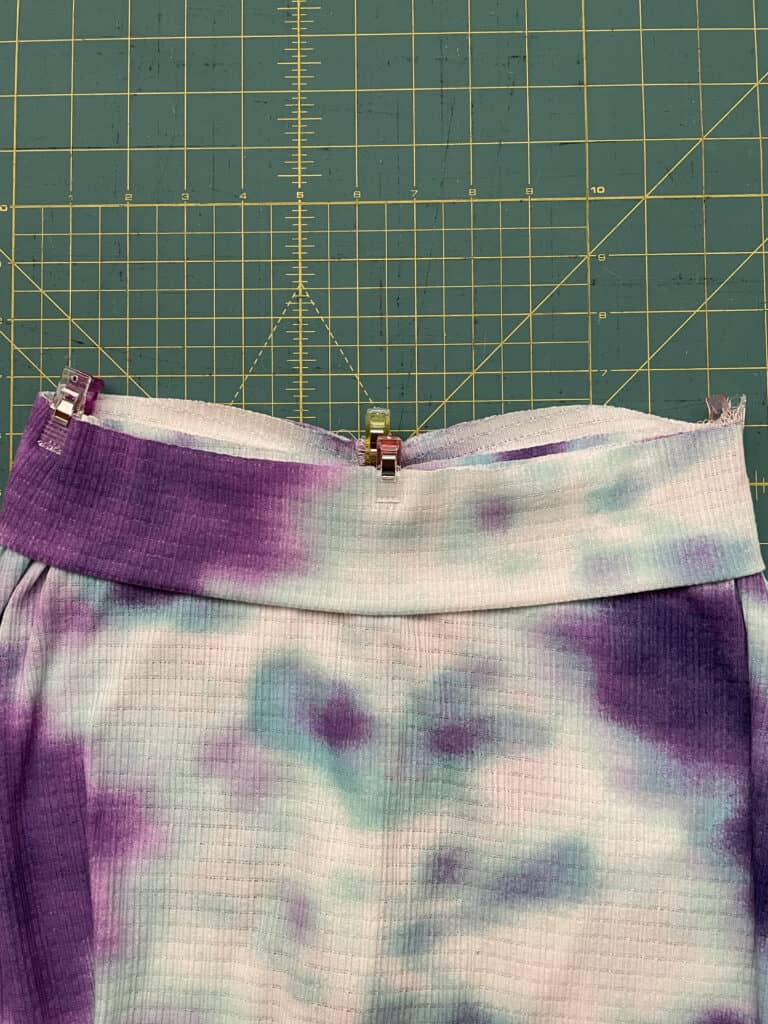
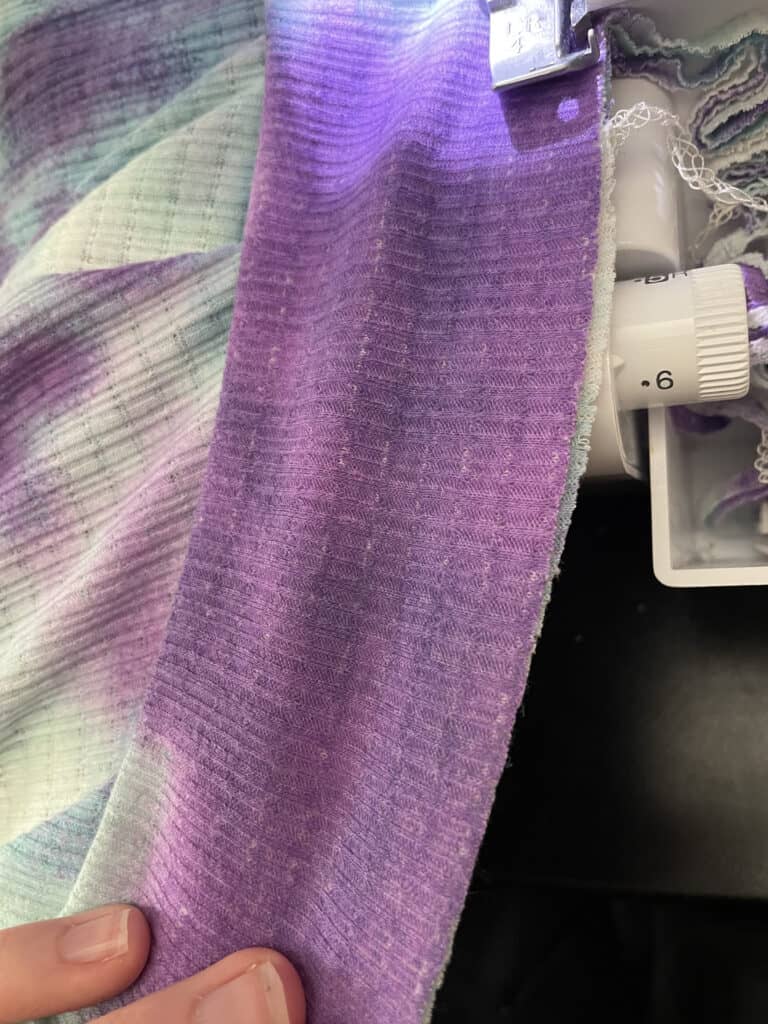
Sew all 3 pieces together, stretching the waistband and Peg Legs slightly to match — careful not to stretch the skirt opening.
Flip waistband up. Hem skirt and shorts.
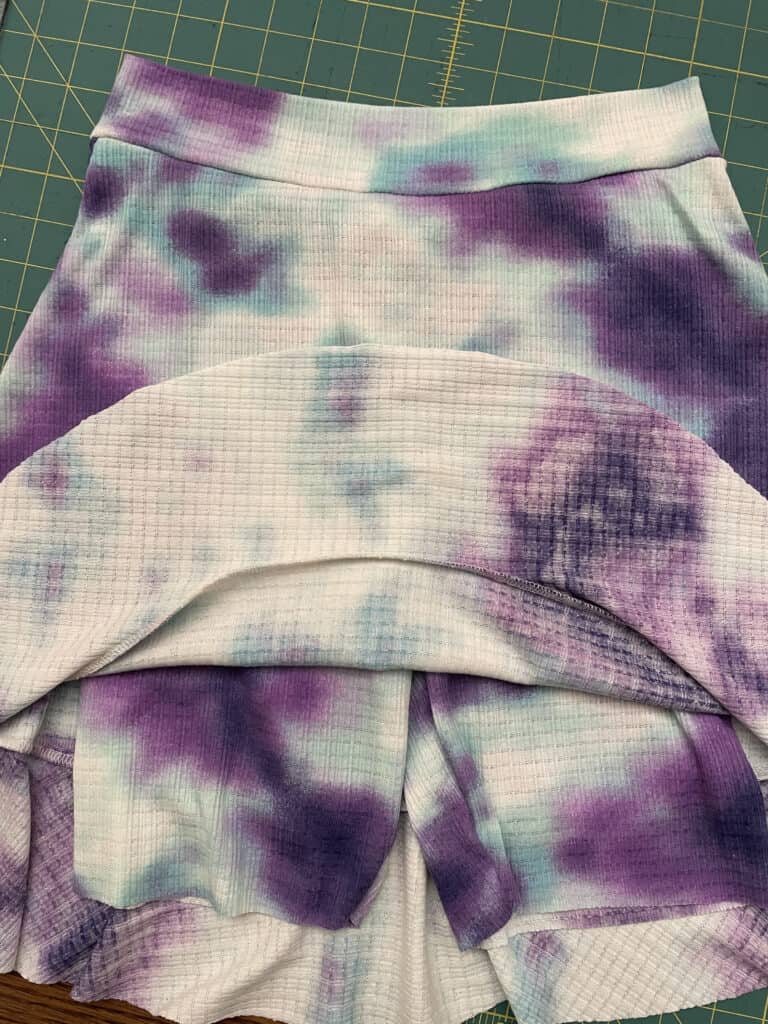
You’re finished! Now go be like Kalene and be cut, comfortable AND covered in your new Peg Legs / Sugar Maple Skort!
I am beyond excited to see the Sugar Maple Skirts that you make! Head on over to the shop and grab yourself a copy of these new patterns! They are available on sale (no code needed) through 11:59pm CST, April 17, 2022.
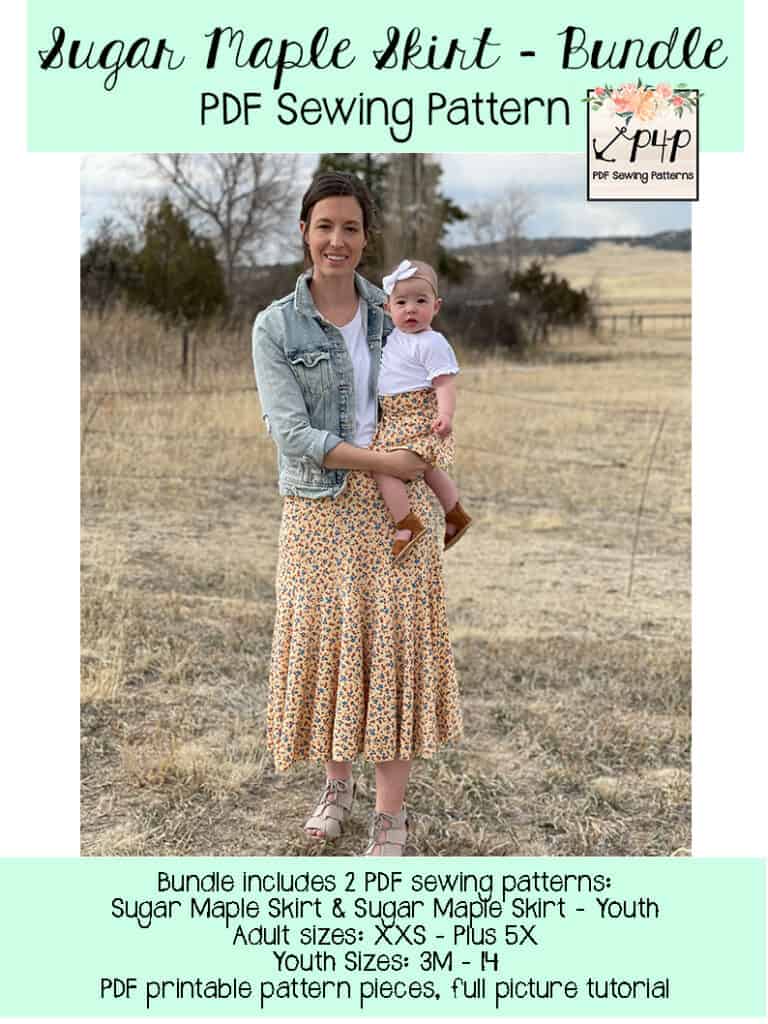
Sugar Maple Skirt – Adult | Sugar Maple Skirt – Youth | Sugar Maple Skirt BUNDLE
Hoping for a little inspiration before diving into some Sugar Maple sewing? Head over to our Facebook group where you can see tester albums full of amazing images!
Sugar Maple Skirt: Adult Album | Sugar Maple Skirt: Youth Album
New Pattern Release :: Sugar Maple Skirt
Happy Spring, Pirate Friends! I have a confession to make: I love wearing skirts. Love them! If you see me during the warmer months, I’m rocking a skirt all the time. It’s such an easy way to look like you’re put together, and they actually help keep you cooler than a pair of shorts. Plus if the skirt has a twirl or swish factor to it, it’s just bonus!
I am so beyond excited to share with you my first ::official:: pattern launch with P4P! Thank you all so much for being part of my journey in the sewing world, it’s like a dream come true to be here today sharing with you my pattern: the Sugar Maple Skirt!
I (Katy) have been living in West Virginia since I moved here for college, and to infuse my love for the Mountain State into things I produce, the names will all be WV inspired. The Sugar Maple is our state tree — thus it’s now the name of our ::new:: set of patterns!
The Sugar Maple Skirt is an a-line skirt with a full circle drop yoke. It is designed to be worn at the natural waist and comes in four lengths: mini, knee, tea and maxi. The top yoke has a flattering, body skimming silhouette, while the fuller part of the skirt joins just below the booty. Whichever length you choose, each provides for ALL the swishy, twirly goodness that you could hope for in a skirt.
The Sugar Maple is a great basic skirt pattern to have, an excellent sewing project for beginners, and it comes together so quickly that you’ll end up making multiple before you even know what happened! You can use this pattern to create something casual, flirty, conservative, dressy, and everything in between. The simple construction of the knit yoga style waistband is geared for comfort in wearing and the different lengths provide opportunity for any style you’re after.
The Sugar Maple Skirt is drafted for knit fabrics with at least 30% stretch. Practically any light-to-medium weight knits will work. Think: jersey knits, rayon/spandex blends, scuba, liverpool, dbp, “yummy” ribbed knits, etc. The waistband will need at least a 50% stretch horizontally, and requires good recovery. Look for a spandex/lycra content of 5% or more for your waistband. The higher the spandex content, harder your waistband will work to keep your skirt in place.

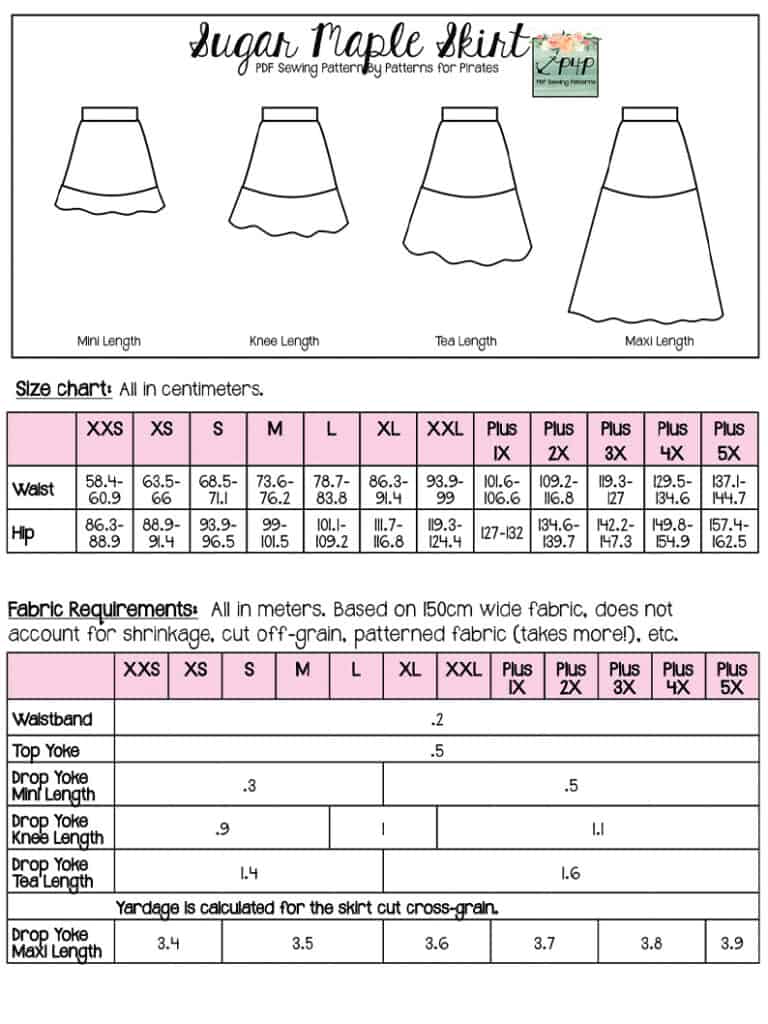
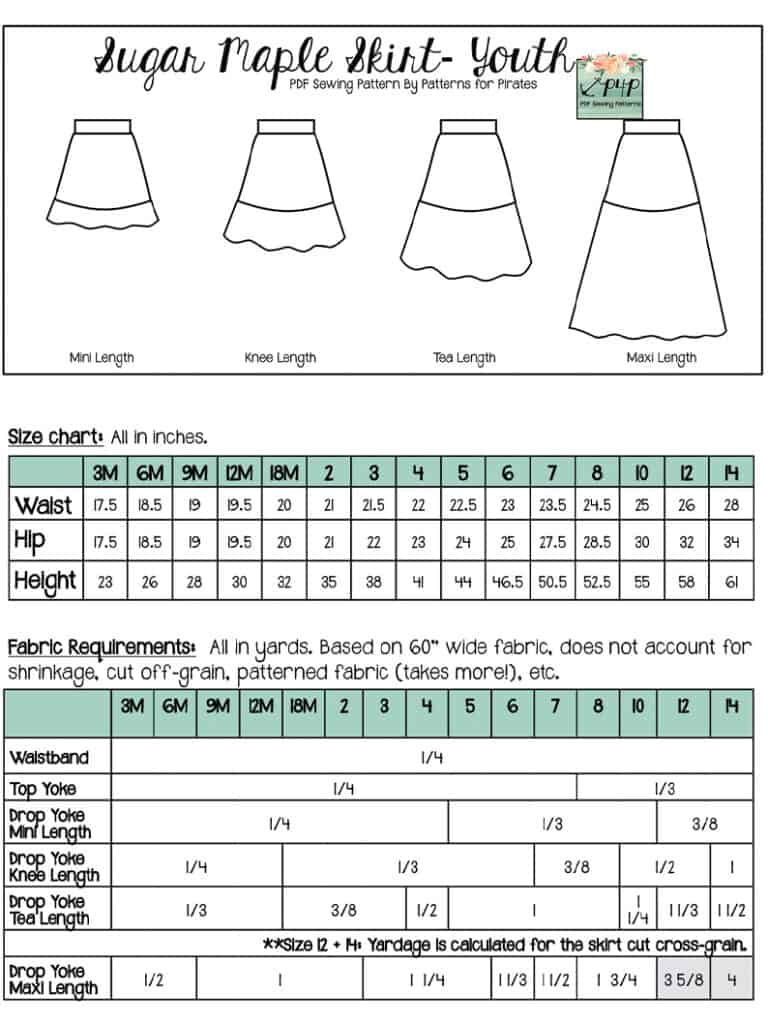
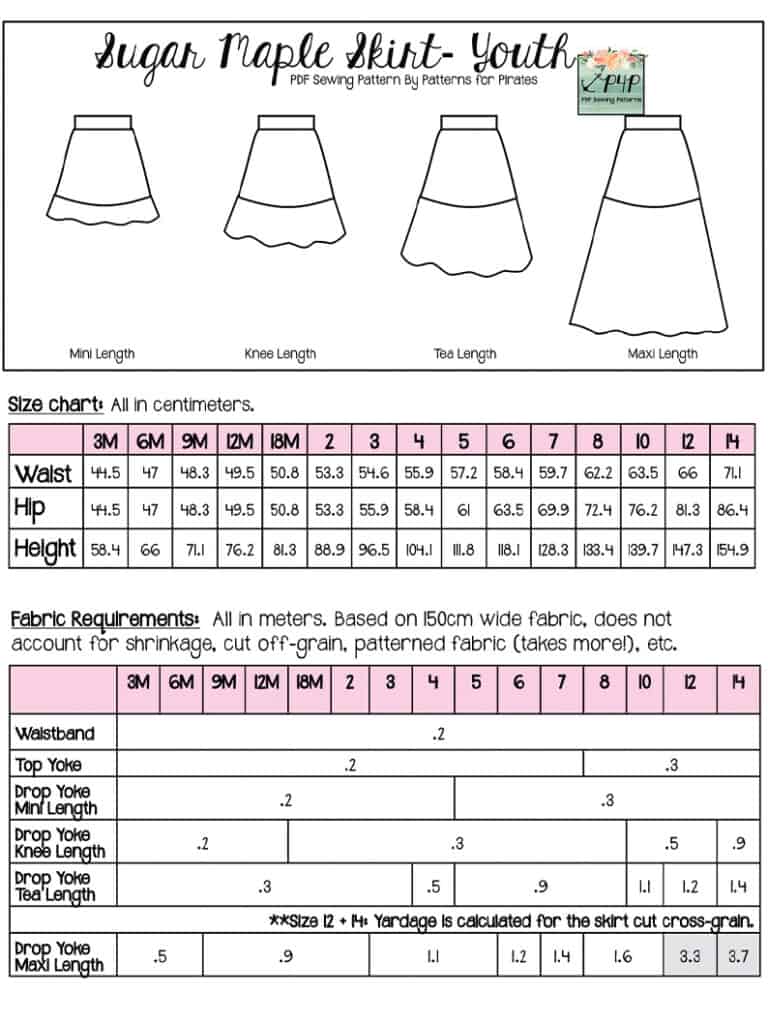
The youth sizes range from 3m – 14 and the adult sizes are for the full, newer size chart, extending from XXS – Plus 5X for the Adult Hourglass Figure.
*Want to learn more about how to measure yourself for these pattern? We’ve got you covered with an in-depth blog HERE. And for even more helpful fun, we have a free* printable that you can use to help record your measurements as you take them.
And in case you’re new to Patterns for Pirates and PDF patterns in general, we have a great blog full of new-user tips HERE to help you get started!
As with all of our current releases and updates, the pdfs now include our layers feature and can be found in Letter, A4, A0 and projector sizes.
Worried about sewing up the Sugar Maple Skirt? Don’t be! We have a video that walks you through the entire construction process:

Let’s take a look at the different ways we can sew up these patterns!
SUGAR MAPLE SKIRT OPTIONS:
MINI LENGTH

KNEE LENGTH

TEA LENGTH
MAXI LENGTH

I am beyond excited to see the Sugar Maple Skirts that you make! Head on over to the shop and grab yourself a copy of these new patterns! They are available on sale (no code needed) through 11:59pm CST, April 17, 2022.
Sugar Maple Skirt – Adult | Sugar Maple Skirt – Youth | Sugar Maple Skirt BUNDLE
Hoping for a little inspiration before diving into some Sugar Maple sewing? Head over to our Facebook group where you can see tester albums full of amazing images!
Sugar Maple Skirt: Adult Album | Sugar Maple Skirt: Youth Album
We also provided for a couple extra ways to extend this pattern with our Sugar Maple Skirt – Easy Hacks. Go take a look!
Protected: Fabric for Pirates :: April 2022 Reveal
Kelli and Charli sew along – day 7
Hello, friends! Thank you everyone who joined us last week for the Kelli and Charli sew along. I thoroughly enjoyed making the stretch velvet Kelli dress…plus , I am Christmas ready with month and months to spare. I know you are here to find out the winners so without further ado, here they are!
Congratulations, Stevie Puckett-Perez ! She is our first winner. Mel won a $20 gift card from Patterns for Pirates and a $25 gift card from Mily Mae Fabrics.

Congratulations go to Cathryn Larkin as well! Cathryn won a gift card from Made for Mermaids valued at $20.

A huge THANK YOU to our sew along sponsor. Make sure you check out Mily Mae Fabrics on Facebook to keep up to date with their sales and fabrics.

I am passing the baton to the mermaids! I’m excited to see what’s next in the sew along group.
Kelli and Charli sew along – day 1 | cut fabric
Kelli and Charli sew along – day 2 | shoulder seams and facing
Kelli and Charli sew along – day 3 | gather front and sew side seams
Kelli and Charli sew along – day 4 | add sleeves
Kelli and Charli sew along – day 5 | create skirt
Kelli and Charli sew along – day 6 | attach skirt and hem
Kelli and Charli sew along – day 7 | winners announcement
![]()
Kelli and Charli sew along – day 6
Welcome to the final day of the Charli and Kelli sew along!
All we have left to do today is attach the skirt to the bodice and hem. If you have not basted the two front skirt pieces yesterday, I recommend you do so today. Find the center point of the skirt’s front and back ad well as bodice front. With the right sides together, match the side seams and center marks on the skirt and bodice. Pin in place.
Tip: If you are using a fabric with vertical stretch or on the heavier side, add clear elastic to the waist seam. This will prevent the bodice from stretching too much when worn.
Sew the skirt to the bodice using a stretch stitch. I love a triple stretch stitch for this step. Press the waistband to reduce any waviness from sewing. Remember that a lot of the fancier fabric require a pressing cloth to be used.
Final steps of this sew along are hemming the skirt and the sleeves. If you opted for the split skirt and cap or sleeveless you are done with your Kelli and Charli projects. Our P4P University hemming knits blog post gives you a few tips for an easy and successful process. I have “discovered” the overcasting stitch on my sewing machine and I found it to just perfect for hemming stretch velvet. Give it a try!
All done! I love the classic look of my glitter velvet Kelli, it will be just perfect for the holidays.


Here is the final construction and hemming video. Post your finished Charli and Kelli dresses in the comments of day 6 photo of the sew along album. I look forward to admiring your beautiful dresses!

Kelli and Charli sew along – day 1 | cut fabric
Kelli and Charli sew along – day 2 | shoulder seams and facing
Kelli and Charli sew along – day 3 | gather front and sew side seams
Kelli and Charli sew along – day 4 | add sleeves
Kelli and Charli sew along – day 5 | create skirt
Kelli and Charli sew along – day 6 | attach skirt and hem
Kelli and Charli sew along – day 7 | winners announcement
![]()
Kelli and Charli sew along – day 5

Welcome to day 4 of the Kelli and Charli sew along! Today we create the gorgeous skirt. I opted for the knee length with slit for my glitter velvet one. Both the adult and the youth patterns include various options and length so everyone can find a favorite.
The Charli skirts and the long overlay Kelli one are similar in construction. Start by hemming the oberlao piece. This step can be done on a sewing machine or a coverstitch. Once hemmed, gather the side seam to match the notched on the skirt side seam. Baste the overlay to the front skirt at the side seams and top. You will now treat this piece as one. All you have left to do is sew the back of the skirt, right sides together, at the side seams. We will hem tomorrow.
Press the side seams to reduce any waviness.
The construction of the split skirt, whether mini, knee or long is slightly different. The first step is to sew a few inches of the side seams at the bottom. We need tom hem this skirt prior to add continuing creating the skirt. I like to sew this step on a sewing machine so I can press the seams open. Hem the bottom of the skirt using a twin needle, coverstitch or zig zag stitch. You are now ready to gather the one side. Remember on day 2 when we gathered the top? We will do the exact same but on the skirt. Once you have matched the notches, pin the side seams of the skirt, right sides together.
TIP: double check to make sure the skirt in not twisted before you sew the side seams!
I like to baste the top of the two front pieces together so they stay in place when we add the skirt to the top. It’s optional, you can just pin them together.
In day 5 video below I show you how to create the slit skirt. Once you finish the steps, post a picture of your progress in the photo comments of day 5. That will be your check in for today. See you back here tomorrow for the final assembly!

Kelli and Charli sew along – day 1 | cut fabric
Kelli and Charli sew along – day 2 | shoulder seams and facing
Kelli and Charli sew along – day 3 | gather front and sew side seams
Kelli and Charli sew along – day 4 | add sleeves
Kelli and Charli sew along – day 5 | create skirt
Kelli and Charli sew along – day 6 | attach skirt and hem
Kelli and Charli sew along – day 7 | winners announcement
![]()
Kelli and Charli sew along – day 4
Good morning, friends! Today we add the sleeves. I love the options included in the Kelli and Charli dress patterns. The lined cap sleeve is adorable for warmer weather. I opted for the 3/4 sleeve for a more ” winter friendly” dress.
3/4 and long sleeve: This pattern features sleeves that are sewn in the round so you will start by sewing the seam right sides together. Don’t forget to press a memory hem. This will make hemming a lot easier after you add the sleeves.
cap sleeve: Start by sewing the hem part of the cap sleeves, main and lining, right sides together. Press and under stitch! Sew the side seam along the main and lining.
Find the notches that correspond to the front and back of each sleeves. Pin the sleeves to the arm opening matching the shoulder notch and side seams. Using a 1/2″ seam allowance and a stretch stitch, sew the sleeves to the bodice.
TIP: when sewing smaller sizes, especially little kids’ ones, I like to place the presser foot inside the opening. It make stitching a lot easier.
In today’s video, you can see how I add the set in sleeves to the Kelli dress. Once you complete the steps post a photo of your progress in the comments of day 4 photo of this sew along album. See you back here tomorrow to start working on the skirt!

Kelli and Charli sew along – day 1 | cut fabric
Kelli and Charli sew along – day 2 | shoulder seams and facing
Kelli and Charli sew along – day 3 | gather front and sew side seams
Kelli and Charli sew along – day 4 | add sleeves
Kelli and Charli sew along – day 5 | create skirt
Kelli and Charli sew along – day 6 | attach skirt and hem
Kelli and Charli sew along – day 7 | winners announcement
![]()
Kelli and Charli sew along – day 3

Welcome to the third day of the Kelli and Charli sew along. Today we work on the front gathers and the side seams.
FRONT GATHER
Let’s start by setting the sewing machine to a gathering stitch. I like mine set to the longest length stitch (five) and lowest tension (zero). Find what works best for you and your machine. Run two gathering stitches (without backstitching) at approximately 3/8″ and 5/8″ from the raw edge on the front piece that has a longer side seam. In doing so, one of the gathering stitches will be in the seam allowance, one will be out of it. Pull the two threads (bobbin thread is easier to pull) so that the notches on the side seams match the on the front and back.
If you are doing the facing style, you will not add gathering stitches to the facing, only the main fabric. Once you gather the side to match the notch on the back side seam, tie knots at the start and the end of the basting stitches to keep them in place. I also encourage you to baste the facing to the gathered front side seam, wrong sides together to keep it in place.
SIDE SEAMS
I like to baste the two front pieces at the side seam first. Make sure that the gathered one goes on top. Now you will treat the two front pieces as one. Pin the front and back bodices at the side seam and stitch with a stretch stitch or serger. The sleeves will be added in the round later on.
You can see in today’s video how I work on the bodice. Once you finish the steps, check in with a photo of your progress in the comments of day 3 photo of the Kelli/Charli sew along.

Kelli and Charli sew along – day 1 | cut fabric
Kelli and Charli sew along – day 2 | shoulder seams and facing
Kelli and Charli sew along – day 3 | gather front and sew side seams
Kelli and Charli sew along – day 4 | add sleeves
Kelli and Charli sew along – day 5 | create skirt
Kelli and Charli sew along – day 6 | attach skirt and hem
Kelli and Charli sew along – day 7 | winners announcement
![]()
- « Previous Page
- 1
- …
- 9
- 10
- 11
- 12
- 13
- …
- 67
- Next Page »